At FastRuby.io, we offer specialized Rails upgrade, maintenance, and technical debt services.
Before doing an upgrade, we strongly recommend doing the Roadmap to Upgrade Rails, a static analysis of your codebase that outlines the action plan to do the upgrade and provides time and investment estimates.
The first step in every Rails upgrade we do is addressing deprecation warnings in the current version. So recently, we set out to extract all deprecation warnings from all versions of Rails starting at Rails 2.3 to help in our static analysis of Rails applications.
In order to extract all deprecation warnings from the Rails source code we first needed to understand how deprecation warnings are emitted.
Up to Rails 7.0, deprecation warnings are handled using the ActiveSupport::Deprecation.warn method. From Rails 7.1 onwards, deprecation warnings are handled using Class.deprecator.warn, for example, ActiveSupport.deprecator.warn or ActiveJob.deprecator.warn.
The first step in our extraction process, then, is to identify all places where the .warn method is called and the receiver of the call is either Deprecation or deprecator. If we just check for calls to .warn, we risk including false positives, like calls to logger.warn.
What we want, however, is the deprecation warning message that gets passed to the .warn method. So the next point of consideration is how to extract the message from the call.
There are a few different ways that this can happen. A message can be a heredoc:
ActiveRecord.deprecator.warn(<<~MSG)
  Defining enums with keyword arguments is deprecated and will be removed
  in Rails 8.0. Positional arguments should be used instead:

  #{definitions.map { |name, values| "enum :#{name}, #{values}" }.join("\n")}
MSG
A heredoc with .squish called on it, and without the parenthesis:
def self.use_big_decimal_serializer
  ActiveJob.deprecator.warn <<-WARNING.squish
    Rails.application.config.active_job.use_big_decimal_serializer is deprecated and will be removed in Rails 8.0.
  WARNING
end
A message can also be a string, whether it’s a literal string:
def initialize(app, unused = nil)
  ActiveSupport::Deprecation.warn "Passing a second argument to ActionDispatch::Callbacks.new is deprecated." unless unused.nil?
  @app = app
end
a binary string:
ActiveSupport::Deprecation.warn "part() is deprecated and will be removed in future versions. " <<
  "Please pass a block to mail() instead."
or a chained string:
ActiveSupport::Deprecation.warn(
  "preload_associations(records, associations, options = {}) is deprecated. Use " \
  "ActiveRecord::Associations::Preloader.new(records, associations, options = {}).run " \
  "instead."
)
Finally, the message can also be assigned to a variable that then gets passed as an argument to the .warn method:
def transfer_encoding(value = nil)
  if value
    message = 'Message#transfer_encoding is deprecated, ' <<
              'please call Message#content_transfer_encoding with the same arguments'
    ActiveSupport::Deprecation.warn(message, caller[0,2])
    content_transfer_encoding(value)
  else
    old_transfer_encoding
  end
end
Therefore, we needed to account for all these different ways of defining a deprecation warning message in order to extract them.
Preparation
As you can imagine, doing this with regex would be a significant challenge. Instead, we’ll leverage the Abstract Syntax Tree (AST) to find what we wanted.
We’ll use tree-sitter to parse the Ruby code and generate the AST. More specifically, the Ruby tree-sitter bindings together with the Ruby grammar for tree-sitter.
The first step is to install the ruby_tree_sitter gem:
gem install ruby_tree_sitter
Then clone the tree-sitter-ruby repository and build the grammar:
git clone https://github.com/tree-sitter/tree-sitter-ruby.git
cd tree-sitter-ruby
make
This should generate the libtree-sitter-ruby.dylib file inside the tree-sitter-ruby repository, which we’ll need to properly configure the parser.
Let’s create a CustomParser class and initialize the TreeSitter parser with the right language. We’ll also need the content of the file we’ll be parsing.
require 'tree_sitter'

class CustomParser
  def initialize(content)
    @parser = TreeSitter::Parser.new
    language = TreeSitter::Language.load("ruby", "tree-sitter-ruby/libtree-sitter-ruby.dylib")
    @parser.language = language
    @content = content
  end
end
We need to traverse the AST to identify and extract the deprecation warnings. Let’s set up a method to parse the content, get the root node of the AST and then traverse it.
def extract_deprecation_warnings
  tree = @parser.parse_string(nil, @content)
  root_node = tree.root_node
  traverse_ast(root_node)
end
The traverse_ast method is what we’ll be working on here, it’ll be responsible for finding what we want in the AST.
Identifying a Warning
Consider the rails/actionpack/lib/action_dispatch/middleware/callbacks.rb file from the Rails 3-1-stable branch of the Rails source code:
require 'active_support/core_ext/module/delegation'

module ActionDispatch
  # Provide callbacks to be executed before and after the request dispatch.
  class Callbacks
    include ActiveSupport::Callbacks

    define_callbacks :call, :rescuable => true

    class << self
      delegate :to_prepare, :to_cleanup, :to => "ActionDispatch::Reloader"
    end

    def self.before(*args, &block)
      set_callback(:call, :before, *args, &block)
    end

    def self.after(*args, &block)
      set_callback(:call, :after, *args, &block)
    end

    def initialize(app, unused = nil)
      ActiveSupport::Deprecation.warn "Passing a second argument to ActionDispatch::Callbacks.new is deprecated." unless unused.nil?
      @app = app
    end

    def call(env)
      run_callbacks :call do
        @app.call(env)
      end
    end
  end
end
There is one deprecation warning there we want to capture. I won’t show the AST for the whole file, but here is the relevant part:
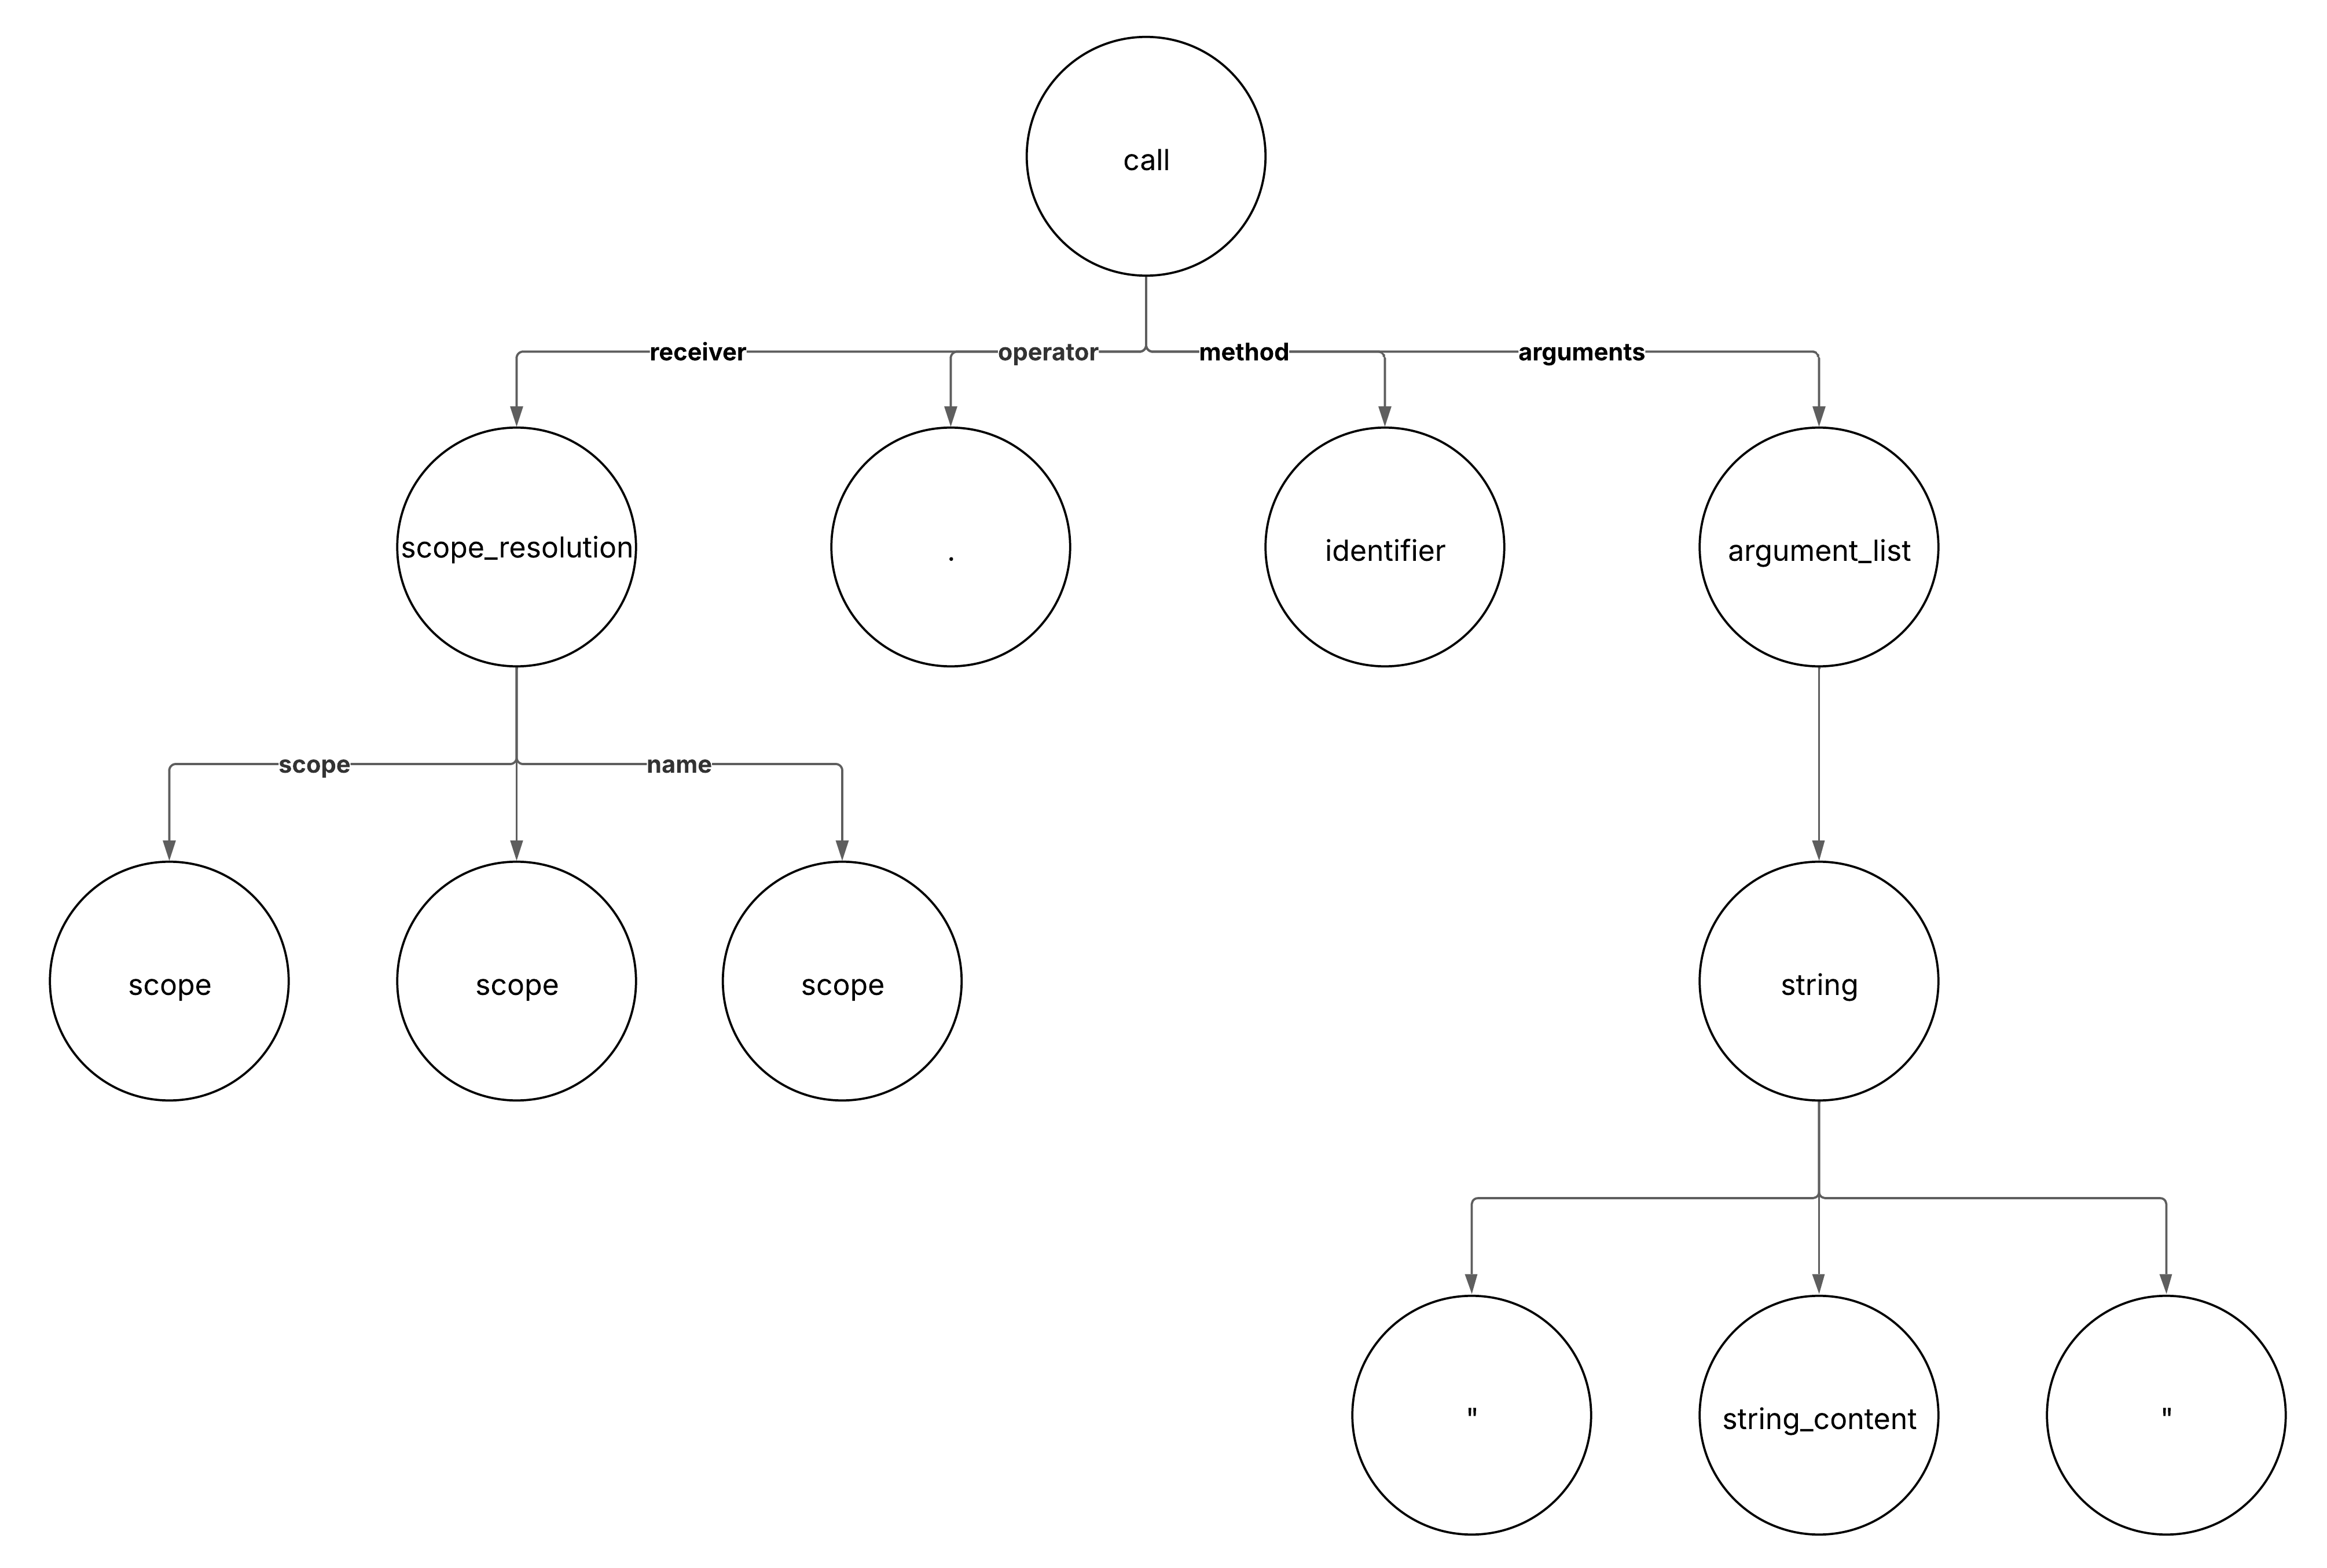
There are several nodes leading up to the call node, accounting for the module, class and the initialize method leading up to the relevant call. Each node in the AST has a type, and some nodes also have field names. Particularly, method nodes have a method field name.
These properties are what we will use to identify the places where the .warn method is being called. We’ll check each node in the AST to see if they are of type :call. If they are, we then need to get the child of field name method. We’ll then check that they are calling the .warn method by checking if the method being called is named warn.
Here, it’s important to mention that the Node object does not offer a direct way to check the text of the method. Instead, it indicates the byte range the node refers to. We can use this information to find, from the source code we parsed, what the text is.
def is_warn_call?(node)
  return false unless node.type == :call

  method_name_node = node.child_by_field_name("method")
  method_name = @content.byteslice(method_name_node.start_byte...method_name_node.end_byte)
  return false unless method_name == "warn"
end
Just being a node of type :call calling warn is not enough though. We need to make sure that the receiver of the call is either Deprecation or deprecator. The :call node should have a child named receiver that we will check to make sure it is one of the two.
If the receiver is Deprecation (should be for Rails 7.0 and older), the receiver node will have a child of type :constant and we can check the text in the source code to see if it matches Deprecation. Similarly, if the receiver is deprecator (for Rails 7.1 and newer), the receiver node will have a child of type :identifier we can check.
If either of those conditions are satisfied, then we have the right call node and can proceed with the extraction.
def is_warn_call?(node)
  return false unless node.type == :call

  method_name_node = node.child_by_field_name("method")
  method_name = @content.byteslice(method_name_node.start_byte...method_name_node.end_byte)
  return false unless method_name == "warn"

  receiver = node.child_by_field_name("receiver")
  return false unless receiver

  has_deprecation_scope = receiver.each.any? do |child|
    if child.type == :constant
      text = @content.byteslice(child.start_byte...child.end_byte)
      text == "Deprecation"
    end
  end

  has_deprecator = receiver.each.any? do |child|
    if child.type == :identifier
      text = @content.byteslice(child.start_byte...child.end_byte)
      text == "deprecator"
    end
  end

  has_deprecation_scope || has_deprecator
end
Once we have identified the right call node, we need to extract the message that is being passed to the .warn method. This is where the different ways of defining a message come into play. We’ll build a method to extract the messages regardless of how they are being defined in the source code.
Let’s start with the heredoc case.
If the message is a heredoc, the node of type :call we’re working with will have a sibling of type :heredoc_body. We can check for that by getting the parent of the :call node and checking if it has a child of type :heredoc_body.
def extract_warning_messages(node)
  results = []
  parent = node.parent

  heredoc_body_node = parent.each.find { |child| child.type == :heredoc_body }
  if heredoc_body_node
    warning = extract_heredoc_content(heredoc_body_node)
    results << warning
    return results
  end
end
If a child of the right type is identified, then we need to extract the heredoc content, which will be inside a child of the heredoc_body_node of type :heredoc_content. As mentioned previously, the text needs to be extracted from the source code using the byte range provided. And in the heredoc case, the message is provided as one string, so it’ll have multiple spaces and line breaks inside the text which we’ll want to clean up.
def extract_heredoc_content(node)
  heredoc_content = node.each.find {|child| child.type == :heredoc_content}
  warning = @content.byteslice(heredoc_content.start_byte...heredoc_content.end_byte)
  warning.gsub(/\n\s+/, " ").strip
end
Next, let’s look at cases where the warning is a string (literal, chained or binary) passed directly to .warn (not assigned to a variable).
In this case, our node of type :call will have a child named arguments.
def extract_warning_messages(node)
  results = []
  parent = node.parent

  heredoc_body_node = parent.each.find { |child| child.type == :heredoc_body }
  if heredoc_body_node
    warning = extract_heredoc_content(heredoc_body_node)
    results << warning
    return results
  end

  arg_node = node.child_by_field_name("arguments")
  if arg_node
    results.concat(extract_strings_from_args(arg_node))
  end
  results
end
This arg_node will have a child of type :string, :binary or :chained_string depending on which situation we have.
def extract_strings_from_args(node)
  extracted_strings = []
  node.each do |child|
    if child.type == :string
      extracted_strings << extract_string_literal(child)
    elsif child.type == :binary || child.type == :chained_string
      extracted_strings << extract_binary_string(child)
    end
  end
  extracted_strings
end
For the string literal case, we can extract the text directly from the source code using the byte range provided.
def extract_string_literal(node)
  text = @content.byteslice(node.start_byte...node.end_byte)
  # Remove the quotes and any leading/trailing whitespace
  if text.start_with?('"') or text.start_with?("'")
    return text[1...-1].strip
  end
  text.strip
end
For binary and chained strings, these nodes will then have children of type :string that contain the parts of the message. We’ll extract the string literal from each part and then join them.
def extract_binary_string(node)
  parts = []
  node.each do |child|
    if child.type == :string
      parts << extract_string_literal(child)
    end
  end
  parts.join(" ").strip
end
Finally, we’ll look at the case where the message is assigned to a variable that is then passed to .warn.
In this case, our node of type :call will have a sibling of type :assignment. So we’ll check the parent for a child of the right type.
def extract_warning_messages(node)
  results = []
  parent = node.parent

  heredoc_body_node = parent.each.find { |child| child.type == :heredoc_body }
  if heredoc_body_node
    warning = extract_heredoc_content(heredoc_body_node)
    results << warning
    return results
  end

  arg_node = node.child_by_field_name("arguments")
  if arg_node
    results.concat(extract_strings_from_args(arg_node))
  end

  assignment_node = parent.each.find { |child| child.type == :assignment }
  if assignment_node
    results.concat(extract_strings_from_args(assignment_node))
  end

  results
end
If the right child is identified, we follow the same flow we followed for the previous case to extract the string literals.
Traversing the AST
We can then use all these pieces to traverse the AST looking for these messages.
def traverse_ast(node)
  return [] unless node
  return [] unless node.named?

  results = []

  if is_warn_call?(node)
    results.concat(extract_warning_messages(node))
  end

  node.each do |child|
    results.concat(traverse_ast(child))
  end

  results
end
Putting it all together
Now that we have everything ready, we can put it all together in the CustomParser class.
require 'tree_sitter'

class CustomParser
  def initialize(content)
    @parser = TreeSitter::Parser.new
    language = TreeSitter::Language.load("ruby", "tree-sitter-ruby/libtree-sitter-ruby.dylib")
    @parser.language = language
    @content = content
  end

  def extract_deprecation_warnings
    tree = @parser.parse_string(nil, @content)
    root_node = tree.root_node
    traverse_ast(root_node)
  end

  private

  def traverse_ast(node)
    return [] unless node
    return [] unless node.named?

    results = []

    if is_warn_call?(node)
      results.concat(extract_warning_messages(node))
    end

    node.each do |child|
      results.concat(traverse_ast(child))
    end

    results
  end

  def is_warn_call?(node)
    return false unless node.type == :call

    method_name_node = node.child_by_field_name("method")
    method_name = @content.byteslice(method_name_node.start_byte...method_name_node.end_byte)
    return false unless method_name == "warn"

    receiver = node.child_by_field_name("receiver")
    return false unless receiver

    has_deprecation_scope = receiver.each.any? do |child|
      if child.type == :constant
        text = @content.byteslice(child.start_byte...child.end_byte)
        text == "Deprecation"
      end
    end

    has_deprecator = receiver.each.any? do |child|
      if child.type == :identifier
        text = @content.byteslice(child.start_byte...child.end_byte)
        text == "deprecator"
      end
    end

    has_deprecation_scope || has_deprecator
  end

  def extract_warning_messages(node)
    results = []
    parent = node.parent

    heredoc_body_node = parent.each.find { |child| child.type == :heredoc_body }
    if heredoc_body_node
      warning = extract_heredoc_content(heredoc_body_node)
      results << warning
      return results
    end

    arg_node = node.child_by_field_name("arguments")
    if arg_node
      results.concat(extract_strings_from_args(arg_node))
    end

    assignment_node = parent.each.find { |child| child.type == :assignment }
    if assignment_node
      results.concat(extract_strings_from_args(assignment_node))
    end

    results
  end

  def extract_strings_from_args(node)
    extracted_strings = []
    node.each do |child|
      if child.type == :string
        extracted_strings << extract_string_literal(child)
      elsif child.type == :binary || child.type == :chained_string
        extracted_strings << extract_binary_string(child)
      end
    end
    extracted_strings
  end

  def extract_binary_string(node)
    parts = []
    node.each do |child|
      if child.type == :string
        parts << extract_string_literal(child)
      end
    end
    parts.join(" ").strip
  end

  def extract_string_literal(node)
    text = @content.byteslice(node.start_byte...node.end_byte)
    if text.start_with?('"') or text.start_with?("'")
      return text[1...-1].strip
    end
    text.strip
  end

  def extract_heredoc_content(node)
    heredoc_content = node.each.find {|child| child.type == :heredoc_content}
    warning = @content.byteslice(heredoc_content.start_byte...heredoc_content.end_byte)
    warning.gsub(/\n\s+/, " ").strip
  end
end
And that’s it! We now have a way to extract deprecation warnings from the Rails source code using the Abstract Syntax Tree.
To do this for the entire Rails codebase, you just need to clone the repository, then iterate over the directory looking for .rb files and extract the warnings from each one.
Conclusion
By traversing the AST, we can extract every deprecation warning message present in Rails, and use this to power tools that help us analyze codebases.
Struggling with your Rails upgrade? We can help!
]]>